🚀 Running the Simulation
Once the scene is organized into groups, parameters are set, and pins / colliders are in place, the day-to-day loop is: Transfer -> Run -> Fetch, with Resume, UpdateParams, and ClearAnimation for iteration.
The Solver Panel
Open the sidebar (N) in the 3D viewport and switch to the add-on tab.
The Solver panel is the second panel in the tab, directly below
Backend Communicator and above Scene Configuration, Dynamics
Groups, Snap and Merge, and Visualization. It is always visible
(never collapsed by default) because it is the primary control surface
during simulation work.
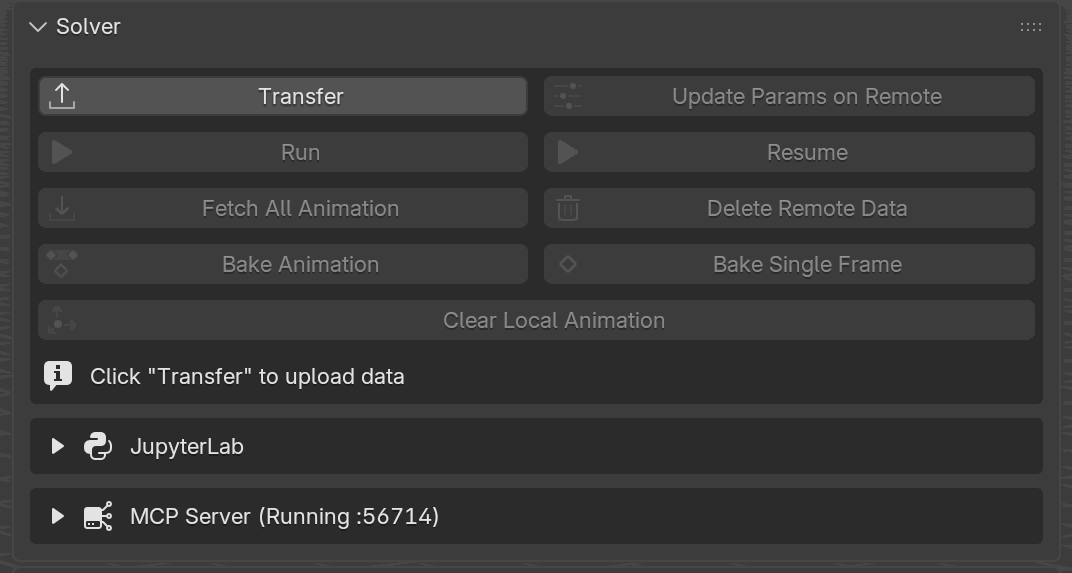
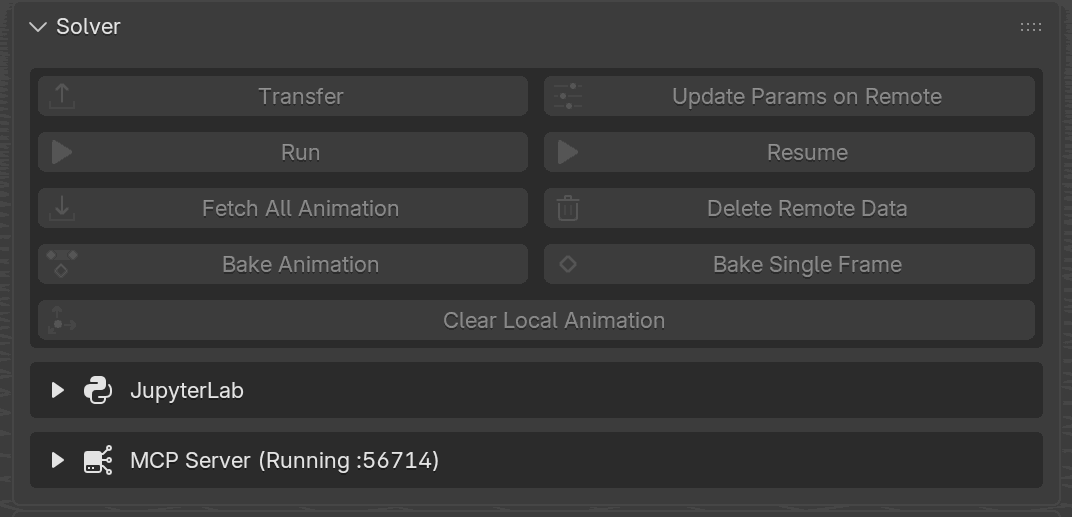
The Solver panel right after the server comes up. Only Transfer is enabled; everything downstream of it is grayed out until the remote has the scene. The info line at the bottom (Click “Transfer” to upload data) reinforces which step is next.
The panel is laid out as a single vertical column of buttons, status indicators, and controls:
Connection row. At the very top of the panel is a row showing the current connection target (host and port) and a Connect / Disconnect button. When connected, the label changes to show the active session.
Primary action buttons. Below the connection row, the main buttons are stacked vertically in this order:
Transfer. Uploads geometry and parameters to the solver.
Run. Starts the simulation.
Resume. Opens a checkpoint picker and continues an existing run from a saved state, without re-uploading or rebuilding.
Update Params. Re-uploads parameters without resending geometry.
Fetch All Animation. Downloads simulation results.
Bake Animation / Bake Single Frame. Convert the fetched animation into standard Blender keyframes (see Baking Animation).
Status line. Between the primary action buttons and the secondary controls, a status line displays the current solver state. This line updates in real time during long operations (see “Visual feedback during each stage” below).
Secondary controls. Below the status line:
Clear Local Animation. Removes fetched animation data.
Delete Remote Data. Wipes the solver’s project data.
Terminate. Hard-stops the running simulation.
Save & Quit. Gracefully shuts down the server.
Abort. Interrupts the current transfer or fetch operation.
Progress bar. During Fetch All Animation, a horizontal progress bar appears inline within the panel, showing download progress as a percentage alongside bandwidth statistics.
Buttons that are not applicable to the current state are grayed out. For example, Run is grayed out until a successful Transfer has completed, and Resume is grayed out unless the server still holds at least one saved state to continue from.
The Buttons
Button |
What it does |
|---|---|
Transfer |
Multi-stage pipeline: delete existing remote data → send mesh → send params → build. |
Run |
Warns on stale mesh hash, clears existing animation, starts the solve. |
Resume |
Opens a checkpoint picker and continues an existing run from a saved state. No re-upload, no rebuild. |
Update Params |
Re-encodes and uploads parameters, then rebuilds. No geometry resend. |
Fetch All Animation |
Downloads per-frame vertex data and applies it as PC2 animation. |
Clear Local Animation |
Removes simulation keyframes and |
Delete Remote Data |
Asks the server to wipe its current project data. |
Terminate |
Hard-stops the current simulation on the server. |
Save & Quit |
Graceful shutdown: flushes state to disk, then exits the server. |
Abort |
Interrupts the current transfer or fetch. Does not touch running sim. |
Terminate and Save & Quit target the server itself; Terminate is
the hard equivalent of pulling the plug, while Save & Quit lets the
solver flush its state first so a later reconnect can pick up from there.

Which buttons light up in each state. The canonical forward flow runs left-to-right along the blue arrows; the purple dashed arrows cover the loops (Update Params), recovery transitions (Clear Local Animation, Resume), and early exits (Terminate, Save & Quit). If a button is grayed out, find the current state on the diagram; the enabled list inside that box is the full answer.
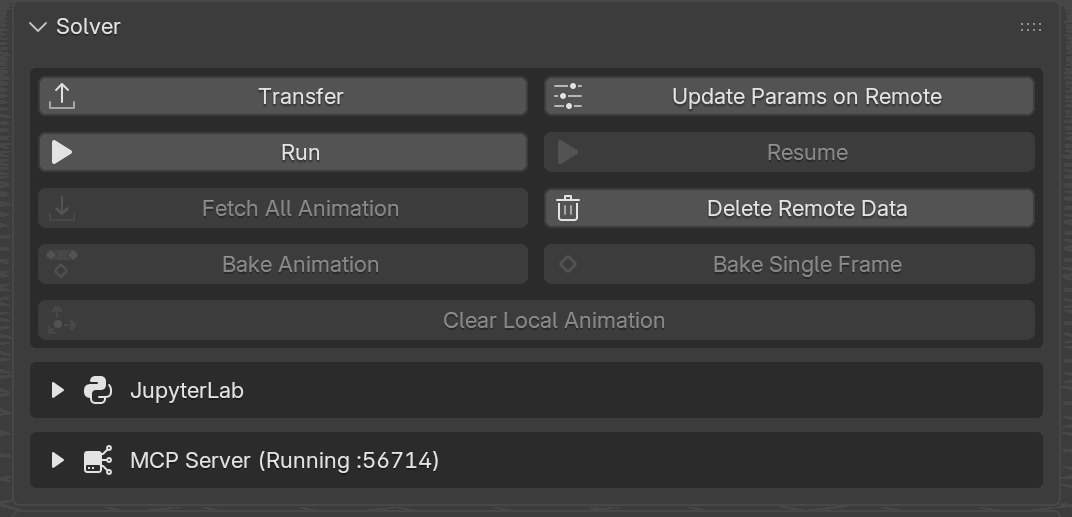
After Transfer completes, the panel settles into the Ready to Run state. Run lights up (the play icon turns solid), and Delete Remote Data is also armed because the remote now holds a project. This is the state you press Run from.
Visual Feedback During Each Stage
The status line on the Solver panel keeps you informed of what the solver is doing at every moment. Here is what you see during each major operation:
Transfer
The status line cycles through several sub-stages as the transfer proceeds:
“Uploading Mesh Data”. The add-on serializes and sends vertex positions, edges, and faces for every active group.
“Uploading Parameters”. Material parameters, scene parameters, pins, operations, merge pairs, and invisible colliders are encoded and sent.
“Building”. The solver is constructing its internal data structures (BVH trees, constraint graphs, contact maps). This step can take a few seconds for complex scenes.
“Ready”. The transfer is complete. The Run button is now enabled.
If any sub-stage fails, the status line shows an error message in red text describing the failure (e.g. “Transfer failed: mesh has zero faces”). The panel remains in the pre-transfer state so you can fix the issue and retry.
Run
Once the simulation starts:
The Solver-panel status line reads “Simulation Running…” and a blue progress bar appears on the Backend Communicator panel above, labeled with the same status.
Live counters appear on Backend Communicator in two blocks. Realtime Statistics shows the current
frameplus several rows, grouped by what they measure:Timing (wall-clock):
time-per-frame,time-per-step,matrix-assembly,pcg-linsolve,line-search.Counts:
num-contact,newton-steps,pcg-iter.Ratios:
toi,toi-advanced,dyn-consumed, andstretch(stretchappears only when the run actually stretches shells or rods).Host:
GPU Util,VRAM Usage,CPU Usage,RAM Usage(shown only when the solver host reports them).
Large counts are abbreviated with a
k,M, orBsuffix (12.44krather than a long digit run). The per-iteration rows (matrix-assembly,num-contact,pcg-iter,pcg-linsolve,line-search,toi) are averaged over the latest step rather than showing a single iteration. Scene Info tracksSimulated FramesagainstTotal Framesso you can see how far through the run you are.When the simulation completes, the status line returns to “Ready to Run”,
Simulated FramesreachesTotal Frames, and a warning row (N frames unfetched. Press “Fetch All Animation”) appears above the Solver panel, directing you at the next step.
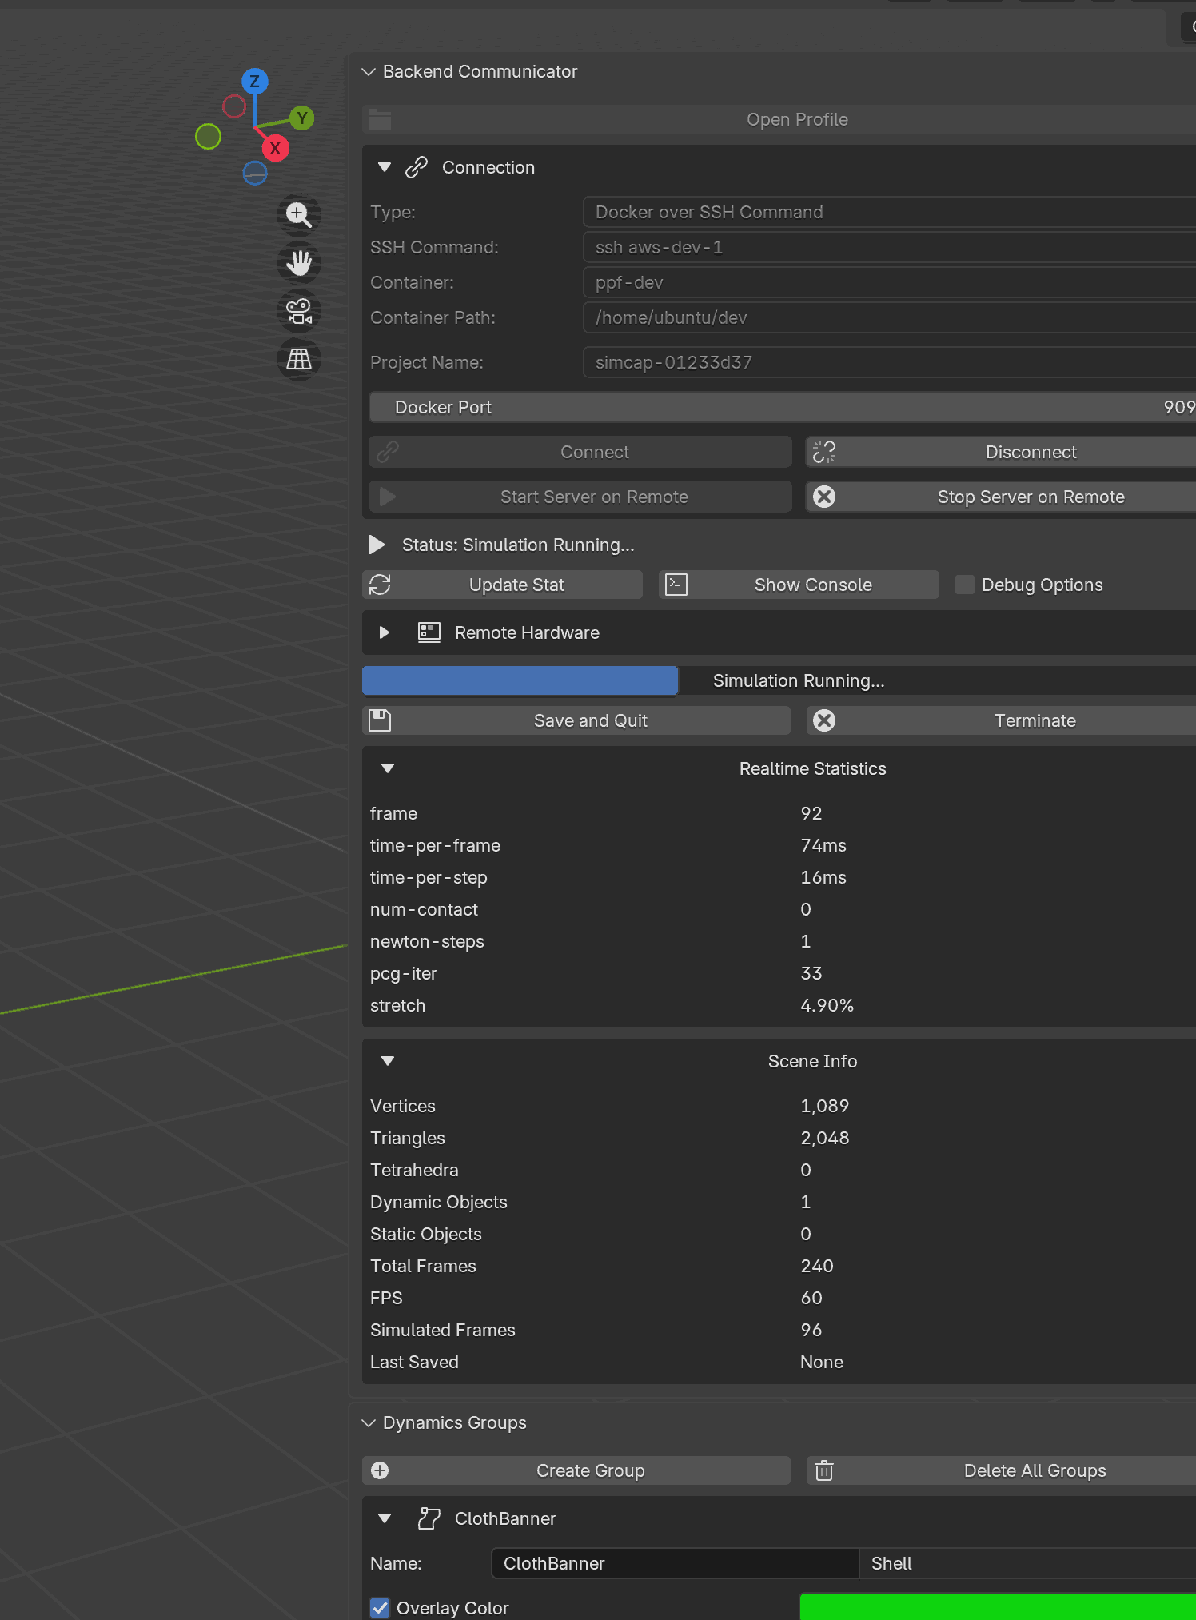
Backend Communicator mid-solve: the status line reads Simulation
Running…, the blue progress bar carries the same label, and the
Realtime Statistics block updates in place as each frame lands. The
Scene Info block below shows Simulated Frames ticking toward
Total Frames.
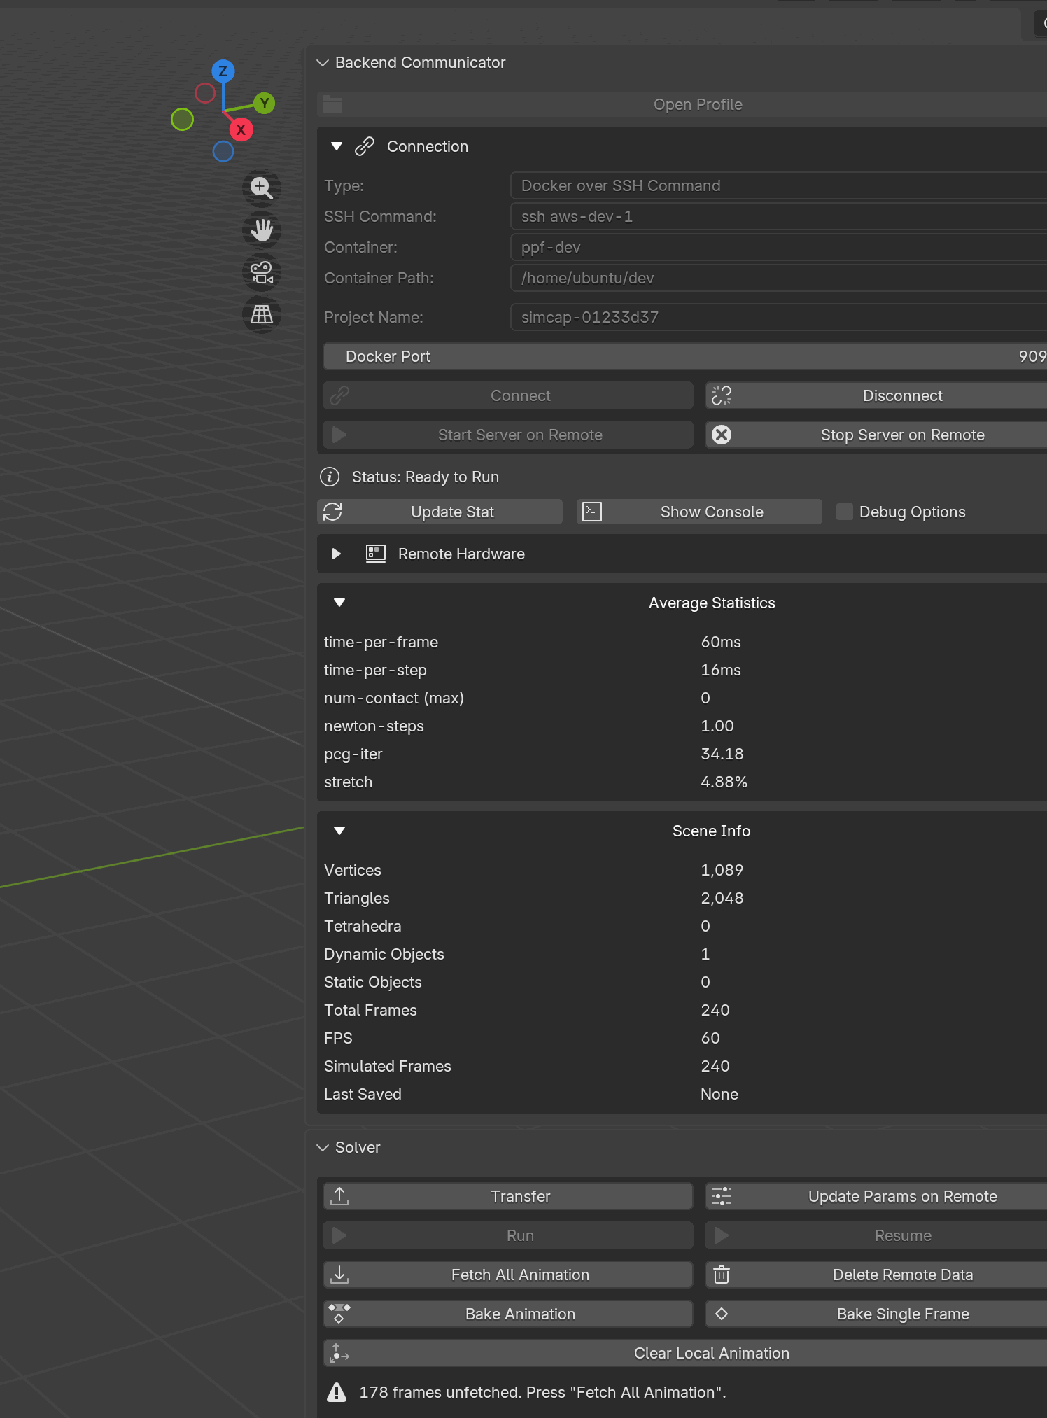
After the run finishes, the status line returns to Ready to Run, the
live counters collapse into an Average Statistics block, and
Simulated Frames matches Total Frames. The warning row above the
Solver panel tells you exactly how many frames are still on the remote
and which button to press next.
Once a run is no longer live, the same box switches its title to
Average Statistics and shows the run summarized over all simulated
frames instead of the latest step: the timing rows become per-frame
averages, the count rows become averages (with num-contact reported as
its peak), and the ratio rows are averaged. This block stays available
after the run as long as the solver still has its log data, so you can
read the overall cost of a solve without watching it live.
Fetch
During a fetch:
A progress bar fills from left to right as frame data is downloaded. The bar shows a percentage and the number of frames fetched so far (e.g.
120 / 240 frames).Bandwidth statistics appear alongside the progress bar (e.g.
12.3 MB/s).On completion, the status line reads “Animation Ready” and the fetched frames are immediately available for timeline scrubbing.
While the simulation is live, the Solver panel goes fully inert; every button is grayed out so you cannot double-fire an action or tear down state mid-solve. The progress counter and per-frame stats live on the Backend Communicator panel above; this panel simply stays out of the way until the solve ends.
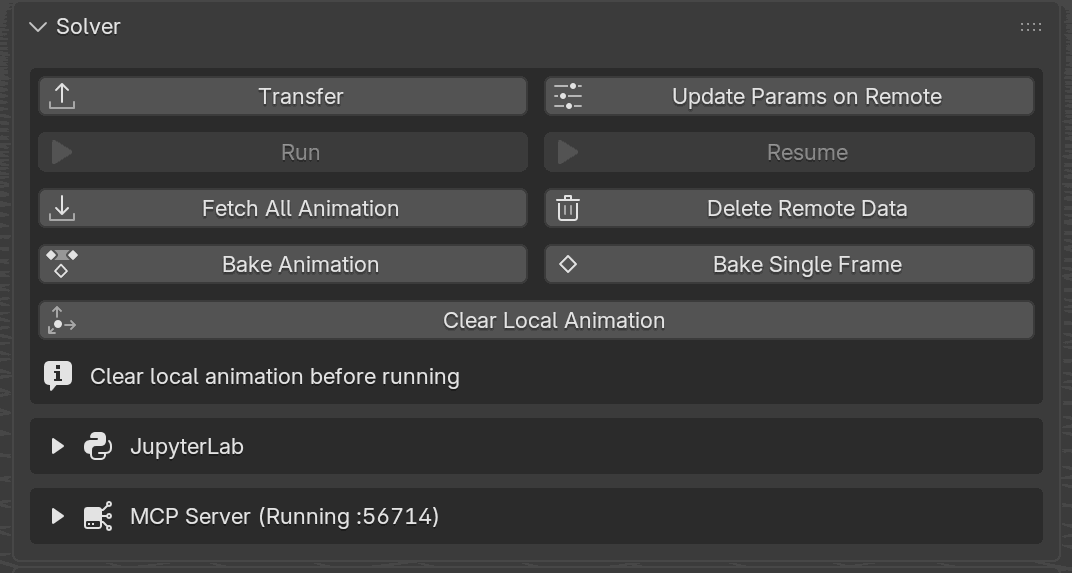
Once Fetch All Animation finishes, the panel returns to its post-sim resting state: Fetch All Animation and Delete Remote Data stay enabled so you can re-fetch or wipe the remote project, and the info line Clear local animation before running reminds you that a second Run needs the previous animation cleared first.
Update Params vs Transfer
When iterating on a scene, the question comes up: does this change need a full Transfer, or is Update Params enough? The rule is:
Transfer re-sends geometry and parameters, then rebuilds.
Update Params re-sends parameters only, then rebuilds. Mesh buffers on the server are preserved, which is why it completes much faster on large scenes.
So Transfer is required whenever mesh topology or group membership changes; Update Params is enough for everything else that lives in the parameter payload (scene settings, material params, pins, colliders, dynamic parameters). The table below enumerates the common edits:
Edit |
What to press |
|---|---|
Mesh topology change (add/remove verts, edges, faces) |
Transfer |
Add or remove an object from a group |
Transfer |
Change a group’s type (e.g. Shell → Solid) |
Transfer |
Pure transform of an assigned object (move/rotate/scale) |
Transfer (new rest) |
Add a new pin vertex group on existing geometry |
Update Params |
Edit an existing pin’s operations (Move By / Spin / Scale / Torque) |
Update Params |
Change material parameters (density, stiffness, friction, …) |
Update Params |
Change scene parameters (gravity, wind, air, step size, …) |
Update Params |
Edit dynamic-parameter keyframes |
Update Params |
Add, remove, or keyframe an invisible collider |
Update Params |
Add or remove a snap/merge pair |
Update Params |
Load a scene profile or material profile |
Update Params |
Toggle an overlay (Show Pins, preview arrows) |
(nothing; viewport only) |
The Mesh hash mismatch warning in the next section is the add-on’s safety net: if you skip Transfer after a topology change, it shows up before Run or Fetch and tells you to re-transfer.
If a run is slow to converge, the Preconditioner scene parameter (Block Jacobi by default, or Schwarz) is one knob worth trying; see Preconditioner.
“Groups Have Changed” Warning
If you edit your meshes (add or remove vertices, change group membership, reassign an object’s type) after Transfer but before Run or Fetch, the panel shows a warning:
Mesh hash mismatch: groups have changed since last transfer.
The warning does not block you, but it means the solver’s data no longer matches what is in Blender. Click Transfer again to re-upload before running or fetching.
Pure transforms and material-parameter edits do not trigger this warning; only topology changes do.
How Animation Plays Back
After Fetch, the add-on downloads per-frame vertex data next to
your .blend file and wires it up to each simulated mesh. Scrub the
timeline and the mesh deforms to the solver’s output. Curves (rods)
update directly on every frame change.
Internally the hookup lives in the Modifier Properties tab, as a
ContactSolverCache entry whose File Path points at a .pc2
file under <blend_dir>/data/<blend_basename>/:
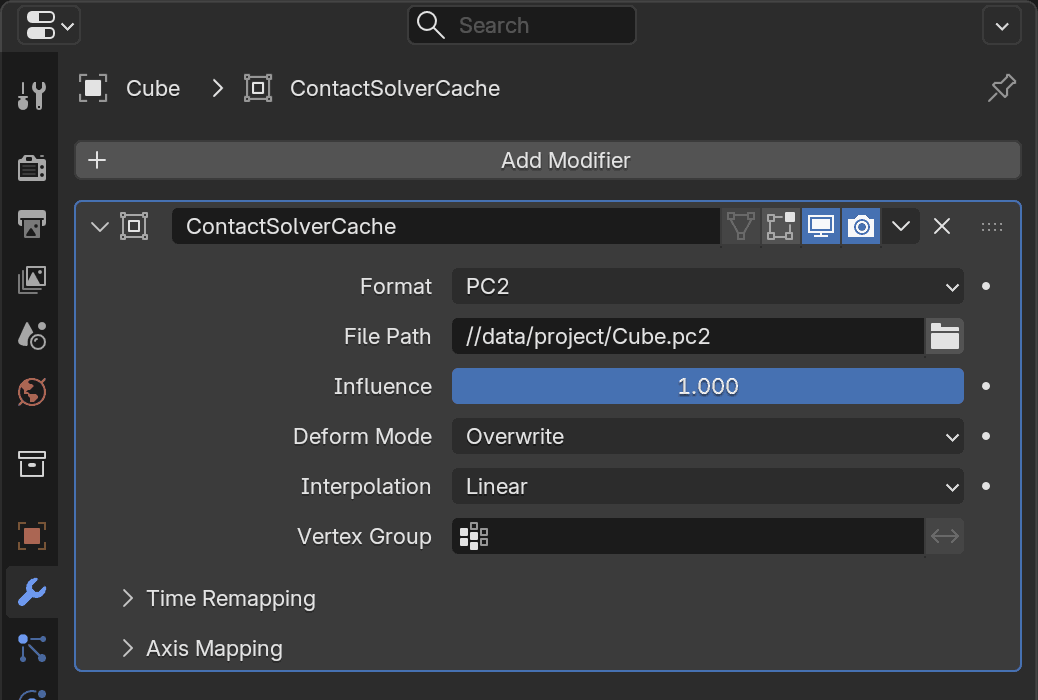
What the ContactSolverCache entry looks like in Modifier
Properties after a successful fetch. The File Path points at
the per-object .pc2 file under
<blend_dir>/data/<blend_basename>/, and that is what plays the
simulation back while you scrub. Leave it in place; deleting it (or
its .pc2 file) removes the animation. To convert the fetched
animation into regular Blender animation (shape keys + fcurves), run
Bake Animation instead; see Baking.
Tip
Save the .blend after fetching. The add-on migrates the fetched PC2
files into a permanent location on save, so the animation survives
closing and reopening the file.
Disconnecting While a Simulation Runs
Once Run is pressed on a remote backend (SSH, Docker, or Windows Native), the solver is doing its work on the remote host; Blender is just watching. You do not have to keep Blender open for the run to continue:
Press Disconnect on the Backend Communicator to drop the live connection. The remote solver keeps going.
You can even quit Blender entirely. The remote process is owned by the solver host, not by the add-on.
Later (minutes, hours, or after a reboot of your workstation), launch Blender, reopen the same
.blend, press Connect, and Fetch All Animation pulls in whatever frames have landed on disk so far.
The session ID baked into the .blend is what the add-on uses to
recognize “this is the same run I started before”. See
Sessions and recovery below for how the
session check works, and
Auto-save and graceful shutdown for
making sure the solver’s own state survives a crash between sessions.
This is not the same as running the sim from JupyterLab. In that scenario the sim was launched from the Blender add-on; JupyterLab just happens to be another way to drive a project that lives on the same solver host. See JupyterLab if you also want to poke at the run from a notebook while Blender is closed.
Sessions and Recovery
Every successful connect mints a fresh session ID and the add-on
stamps simulation artifacts (the fetched PC2 files and the remote
project directory) with it. Saving the .blend stores the active
session on the scene; on reopen, reconnecting compares the new session
against the saved one and warns if they differ, meaning the fetched
frames on disk may no longer correspond to anything the remote knows
about. This
is how the add-on distinguishes “this is the sim I was running before I
closed Blender” from “this is a fresh run on a different server”.
Auto-Save and Graceful Shutdown
Three related features:
Auto-save (the Auto Save and Auto Save Interval fields on the Scene Configuration → Save and Checkpoints sub-panel): when enabled, the solver periodically dumps its state so a crash or disconnect does not cost all the progress. This runs inside the server process.
Save State on Finish (same sub-panel): saves a state on the final frame before the solver exits, so a completed run stays resumable even when auto-save is off.
Save & Quit: a one-shot operator that asks the server to flush state and exit cleanly. After Save & Quit, the next reconnect can pick up the run where it left off.
Terminate does not flush state. Use it when the simulation is misbehaving and you want it gone.
Resuming a Run
Resume continues a run the server already holds, without re-uploading geometry or rebuilding. Click it and a checkpoint picker opens, listing the saved states the server has on disk. Each entry is shown as a Blender 1-based frame, matching Last Saved in Scene Info. Pick one and the solver continues from that frame; frames before the chosen point are kept, and frames after it are overwritten.
Because Resume reuses the state already on the server, it refuses when the scene has drifted from what the server last received:
If the geometry changed, Resume stops and asks you to Transfer then Run for a fresh simulation. The cached state no longer matches the mesh.
If only the parameters changed, Resume stops and asks you to press Update Params first. Update Params re-sends parameters and rebuilds while preserving the saved checkpoints, so you can Resume immediately afterward.
For Resume to have anything to offer, the server must hold at least one saved state. That comes from Auto Save, from Save State on Finish, from explicit per-frame Save Checkpoints, or from Save & Quit. With no saved state, Resume stays grayed out.
Recovery Scenarios
The behavior depends on who failed. Four cases cover the common ones; the table shows the first move in each.
What happened |
What the solver has on disk |
What to do next |
|---|---|---|
You closed Blender or lost the network mid-run. Solver kept running. |
Everything up to “now”. |
Reopen the .blend, Connect, Fetch All Animation. If still running, leave it. If it finished while you were gone, fetch picks up the rest. |
You clicked Terminate or killed the run. |
Frames up to terminate, plus any saved states. |
The solver transitions to Resumable. Click Resume, pick a saved state, and continue; or Run to clear the animation and restart. |
The run failed (a frame did not converge). |
Frames up to the failure, plus any saved states. |
The status line reads Simulation Failed, but it stays resumable while at least one saved state exists. Click Resume and pick an earlier state to continue past the trouble spot, or fix the scene and Run again. |
Solver process crashed (segfault, OOM, server reboot). |
Whatever was auto-saved (if Auto Save was on) or just the frames already written. |
Reconnect and Start Server. If saved states exist, the solver comes up Resumable and Resume lets you pick one. If not, press Run to re-simulate. |
Auto Save is what distinguishes “lose a few seconds of solve” from “redo the last hour” in the crash case. It’s on the Scene Configuration → Save and Checkpoints panel; enable it before long runs and leave the default interval for most scenes.
If Fetch finds a session ID mismatch at reconnect, the remote project on disk is not the one your .blend remembers (a fresh server start, a different cloud host, or a colleague’s run). Either Transfer to replace the remote with your current scene, or connect to the host where the original run lives.
Port-in-Use on Reconnect
When you restart Blender while a previous ppf-cts-server is still
listening on the configured port (typical for Windows Native, where
the add-on owns the spawn), Connect does not error out: the add-on
probes the port with a minimal TCMD ping, and if the response
identifies a live ppf-cts-server, it attaches to that process
instead of spawning a new one. Your previous run is still there,
ready to Fetch. SSH and Docker backends always start the server
out of band, so attaching is implicit there.
If the port is held by a different process (or by a stale ppf-cts-server
that no longer responds to the protocol probe), the Backend Communicator
panel surfaces the error Port N is in use together with a Force
Terminate Process button. Clicking it walks the process tree, force-kills
the process holding the configured port, and lets the next Connect
spawn a fresh server. The button only appears for this specific error
wording, so it cannot be used to kill an unrelated process by accident.
Aborting a Transfer or Fetch
Abort interrupts the current transfer or fetch. It does not cancel a running simulation; for that, use Terminate. An aborted fetch clears the in-flight animation buffer; rerun Fetch to restart from the first missing frame. The Solver panel surfaces a warning line when the remote has more frames than have been fetched locally:
N frames unfetched. Press “Fetch All Animation”.
Blender Python API
The same workflow is available from Python:
from bl_ext.user_default.ppf_contact_solver.ops.api import solver

# The core loop.
solver.transfer_data()
solver.run_simulation()
solver.fetch_animation()

# Iterate on parameters without resending geometry.
solver.param.step_size = 0.002
solver.update_params()

# Clean up.
solver.clear_local_animation()
solver.delete_remote_data()

# Recovery flow: graceful vs hard stop.
solver.save_and_quit_simulation()   # flush, exit server
solver.terminate_simulation()       # no flush, immediate
Under the hood
Operator names
Button |
|
|---|---|
Transfer |
|
Run |
|
Resume |
|
Update Params |
|
Fetch All Animation |
|
Clear Local Animation |
|
Delete Remote Data |
|
Terminate |
|
Save & Quit |
|
Abort |
|
Any solver.* method in Python that is not explicitly defined on the
solver proxy is forwarded to the matching Blender operator, which is why
the Python API above maps one-to-one onto this table.
Mesh hash
The topology hash is computed over each active group’s vertex count, edge topology, and face topology. Pure transforms and material-parameter edits do not affect it.
PC2 files on disk
Per-object PC2 lives under <blend_dir>/data/<blend_basename>/. Each
object has a vert_N.bin per simulated frame. A fetch also writes
map.pickle and surface_map.pickle for the object-to-vertex mappings.
ContactSolverCache entry
Mesh playback is driven by a ContactSolverCache entry in the
Modifier Properties tab, pointing at the object’s PC2 file. It
sits in the first modifier slot with frame_start = 1.0, so it
deforms the rest mesh before any other deformer runs. Curves are
updated directly on every frame change and do not need an entry in
that tab.
Session ID format
The session ID is a 12-hex-character string. It is embedded in the PC2 header, stamped onto each simulated object, and attached to the remote project directory. That is what the mismatch warning on reopen is comparing against.