🎬 Your First Simulation
This walks a cloth-over-sphere scene through a complete sim end-to-end. Adjust parameters later; the goal here is to see a simulated drape play back in the timeline.
Build the Scene
Before touching the add-on, lay out the two objects the sim needs: a subdivided plane to act as the cloth, and a sphere underneath as a static collider for it to drape over.
Delete the default cube. A fresh Blender start-up ships one; select it and press X (or Object → Delete).
Add the static sphere. Add → Mesh → Ico Sphere, then bump Subdivisions in the operator redo panel to around 4 (~1200 faces). Prefer an ico-sphere over a UV-sphere: its near- uniform triangulation avoids direction-dependent stiffness at the poles when the cloth starts interacting with it. Shade-smooth the sphere (Object → Shade Smooth) so the silhouette stays clean as the cloth wraps it.

After step 2: the ico-sphere at the origin. The wireframe shows the near-uniform triangulation that keeps contact response direction-independent.
Add the cloth plane, well clear of the sphere. Add → Mesh → Plane, scale it up (or pass
size=2.4in the redo panel), and move it up along Z so it sits above the sphere with a clear gap; a few centimeters is plenty. The solver rejects self- intersecting rest geometry, so the plane must not touch the sphere in frame 1.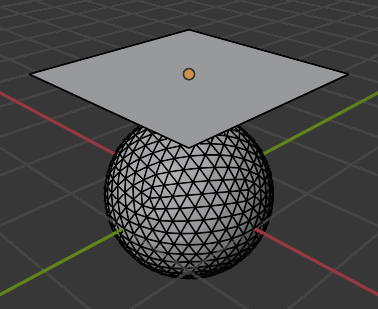
After step 3: the plane hovers above the sphere with a visible gap. A single quad for now, with no internal topology to deform.
Subdivide the plane enough to drape. A 2×2 plane has no flexibility; it will land on the sphere as a rigid slab. Add a Subdivision Surface modifier (Add Modifier → Subdivision Surface), switch Type from the default Catmull-Clark to Simple (Catmull-Clark rounds corners and can introduce self- intersections), raise Levels Viewport to 5, match Render, then Apply it so the solver sees the dense topology directly. That gives you a 33×33 grid, which is enough resolution to fold naturally over the sphere.
After step 4: the Simple subdivision bakes into the mesh as a 33×33 grid of quads. That is the resolution the solver will see.
Tip
As a rule of thumb, aim for an average edge length of 1–3 % of the cloth’s bounding-box diagonal. Below ~1 % you pay a large simulation cost without much visual gain; above ~3 % folds and wrinkles get blocky. See Scene Setup via MCP for the full rationale.
Register the Objects with the Add-on
Pick a connection type. In the Backend Communicator panel, choose
Localif the solver lives on this machine. It has the fewest moving parts. Fill Path with the solver checkout (the folder whosetarget/release/containsppf-cts-server) and set Project Name to something short. For other backends see Connections and the per-backend pages (local, ssh, docker, windows).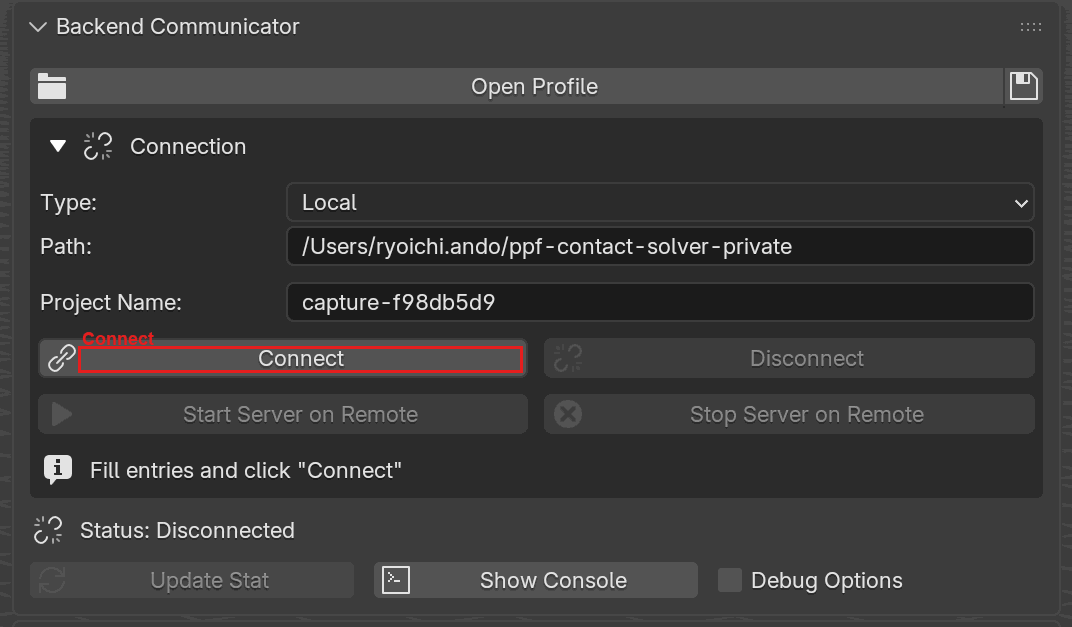
Step 1: pick Local from the Type dropdown, fill the Path and Project Name fields, then click the highlighted Connect button.
Connect, then start the server. Click Connect. The status line changes to Waiting for Server Start… when the handshake completes. Click Start Server on Remote. The add-on launches
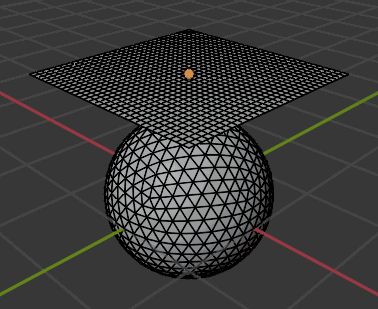
ppf-cts-serveron the remote in the background and waits for it to answer. Status advances to Waiting for Data once the server responds. If the port is already in use, the add-on auto-attaches to the existingppf-cts-serverprocess; if a foreign process owns it, click Force Terminate Process to release the port.Create the Cloth group (Shell). In the Dynamics Groups panel, click Create Group, set Object Type to Shell, and rename it Cloth. Select the plane in the 3D viewport, then click Add Selected Objects in the group. The add-on tints the plane green (the Shell overlay color) as confirmation.
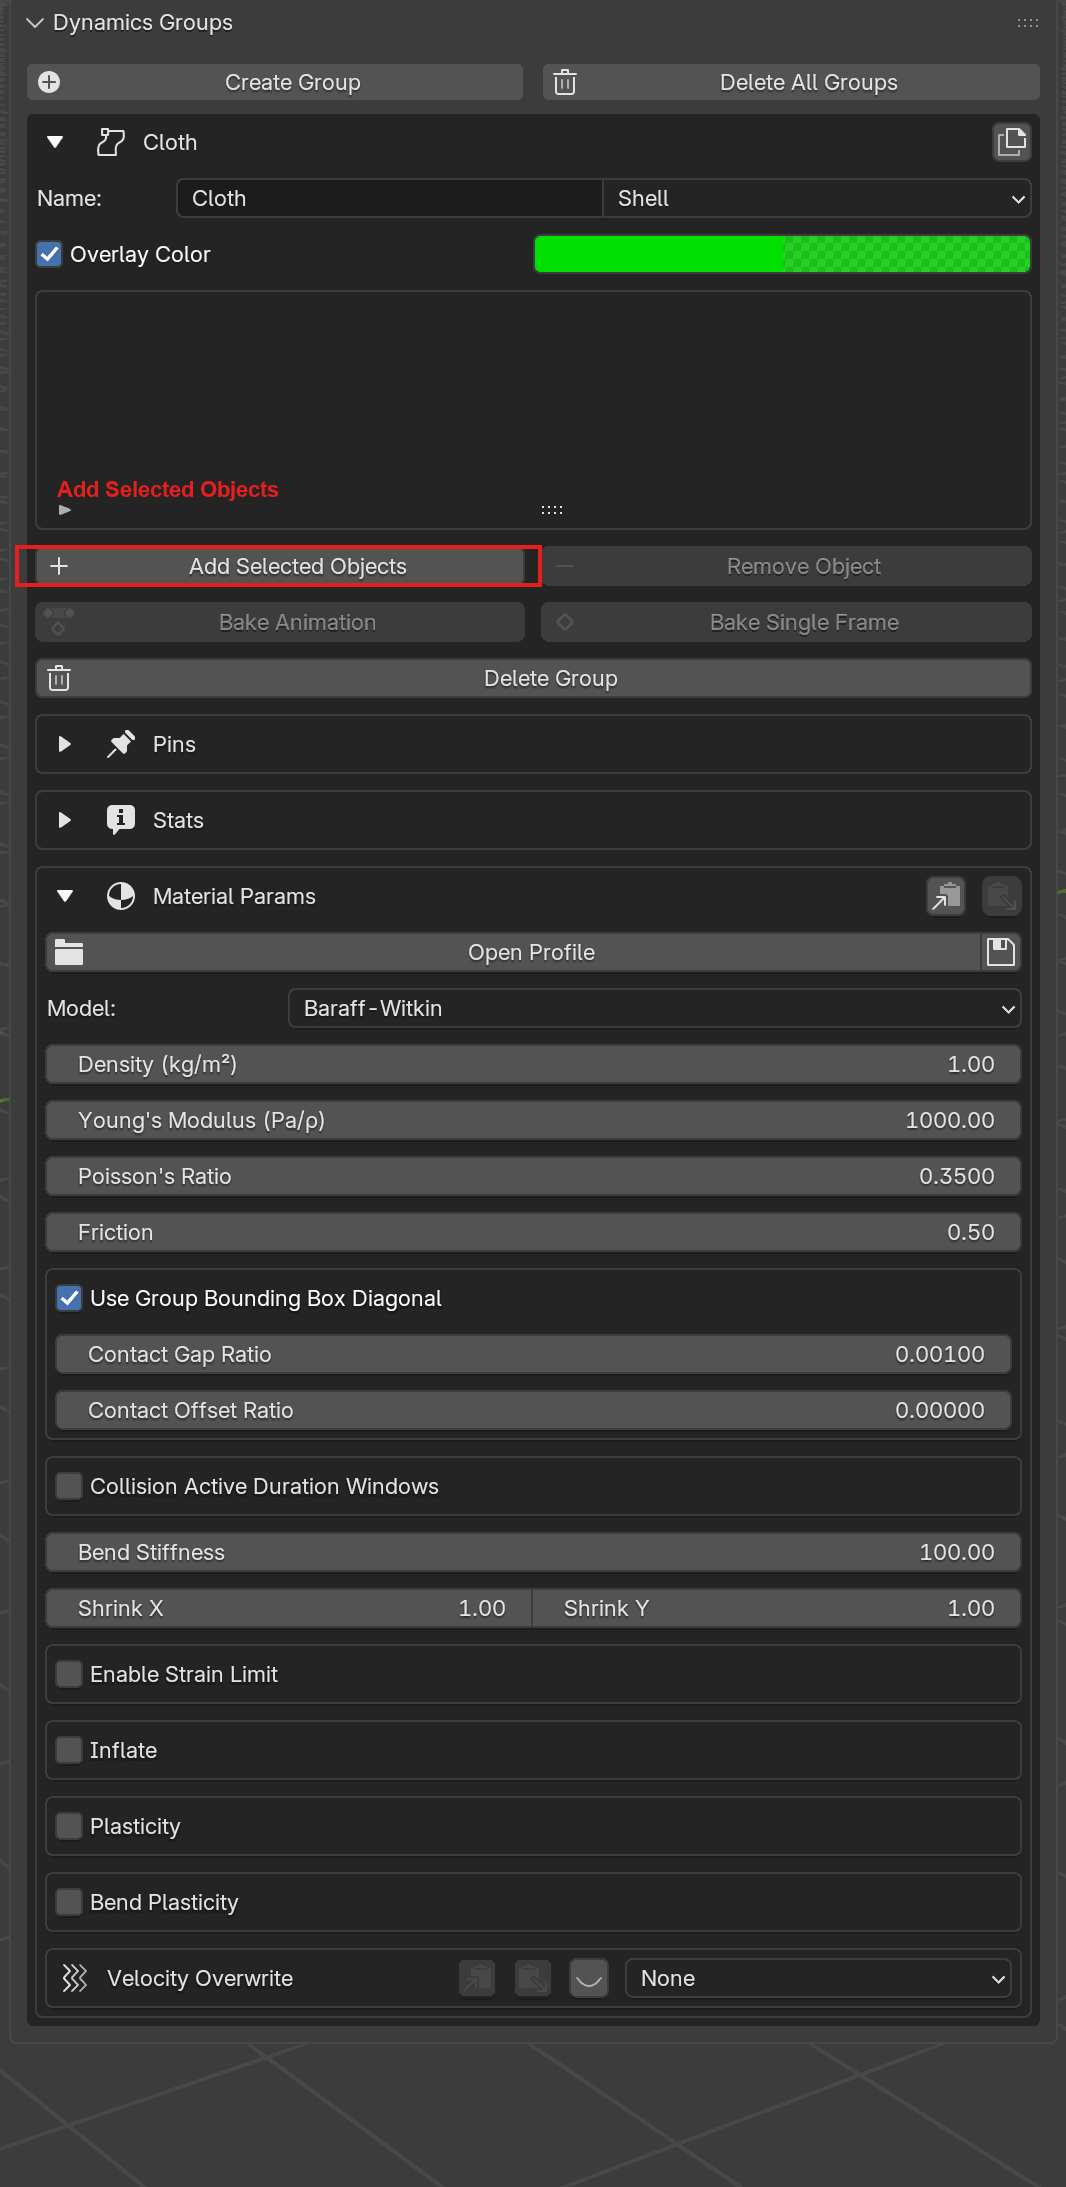
The Dynamics Groups panel after Create Group. The Assigned Objects list is still empty; Add Selected Objects (red outline) is the button you press next to attach the currently selected plane to this group.
Create the Sphere group (Static). Click Create Group again, set Object Type to Static, and rename it Sphere. Select the sphere, then Add Selected Objects. The sphere picks up the blue Static overlay color. At this point the scene should look like the image below: a green cloth sheet floating cleanly above a blue sphere.
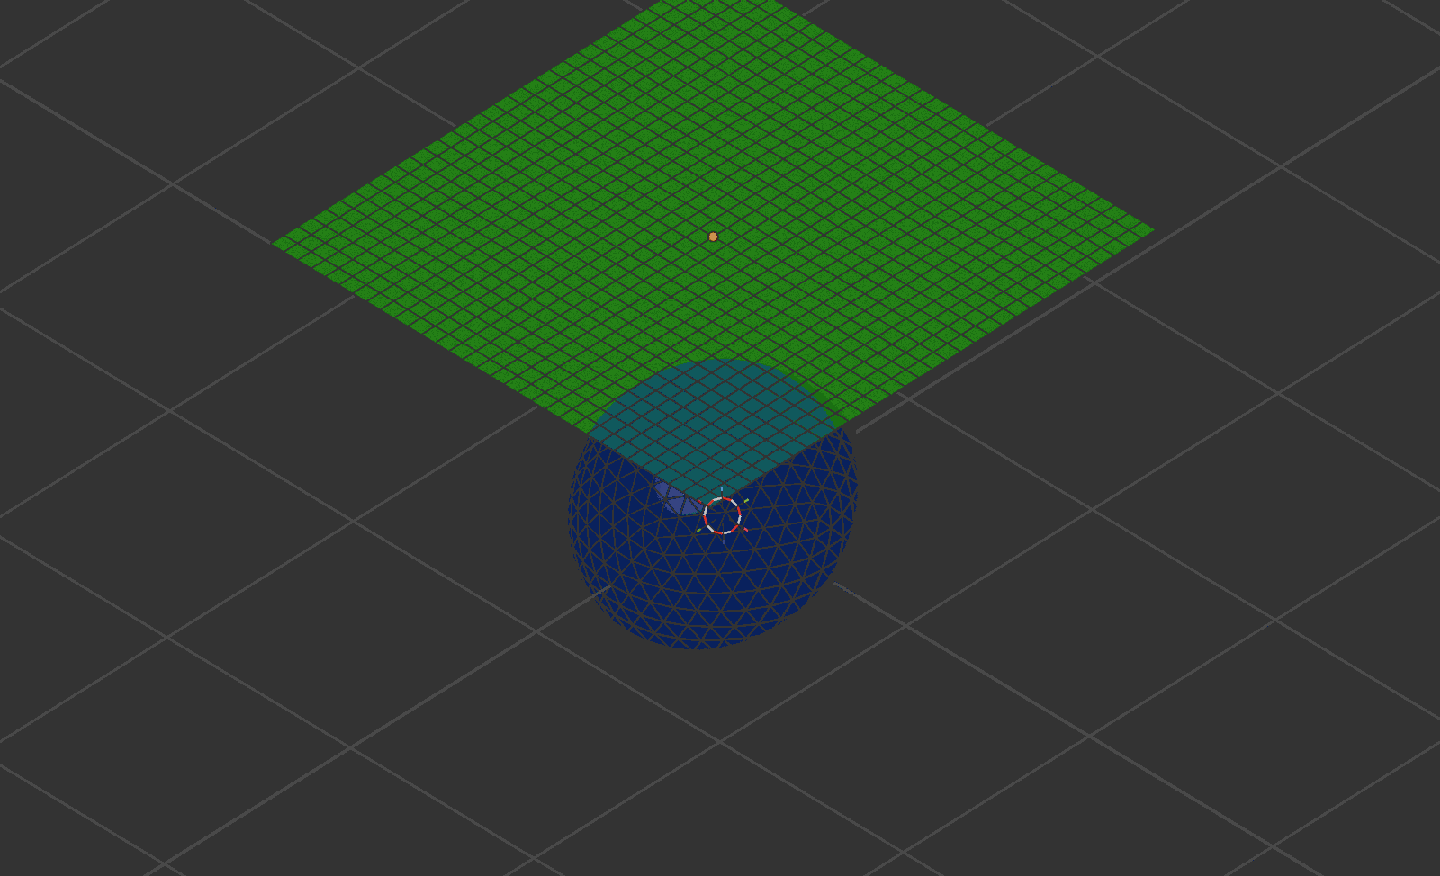
The starting scene. Green = Shell (cloth), blue = Static (sphere). The wireframe on the plane shows the Simple subdivision the solver will deform; the icosphere’s uniform triangles are the contact surface the cloth will drape against.
Material defaults (Baraff-Witkin cloth) are fine for a first run.
Transfer, Run, and Play Back
Transfer. In the Solver panel, click Transfer. This encodes the mesh and parameters, uploads both, and triggers the remote build stage. The status line advances through Uploading scene…, Building Scene…, then Ready to Run.
Run. Click Run. The status reads Initializing… while the solver populates its in-process state, then changes to Simulation Running… once the server reports it has finished initialization. Realtime statistics appear, and a Terminate button stops the run early. Frames are fetched incrementally as they complete.
Note
If Run is grayed out and you see Clear local animation before running, click Clear Local Animation first. Previous simulation output stays attached to the objects until you do.
Fetch and play back. When the sim finishes, click Fetch All Animation to pull any frames the live-fetch missed. The add-on downloads per-object PC2 files into
data/<blend_basename>/next to the.blendfile and wires them up to each simulated mesh. Scrub the timeline or press play; Blender reads vertex positions straight from the downloaded PC2 files, and the cloth settles onto the sphere frame-by-frame.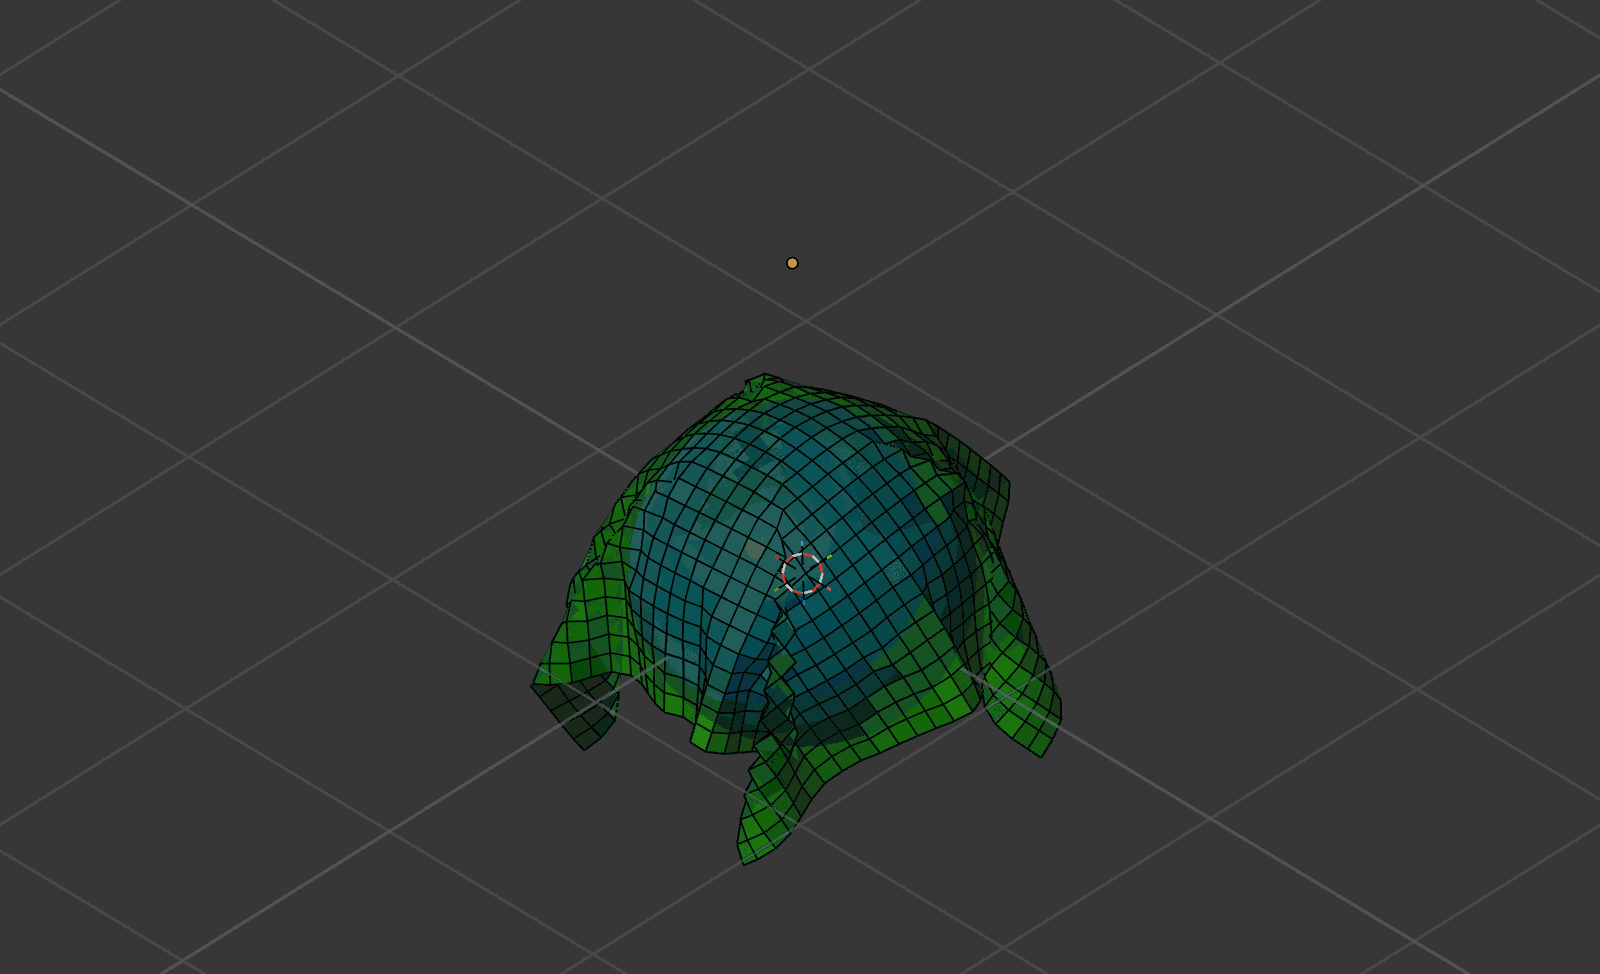
The draped end state. The Shell overlay is still green and the Static overlay still blue; the only thing that has changed frame-to-frame is the vertex positions Blender reads out of the downloaded PC2 file.
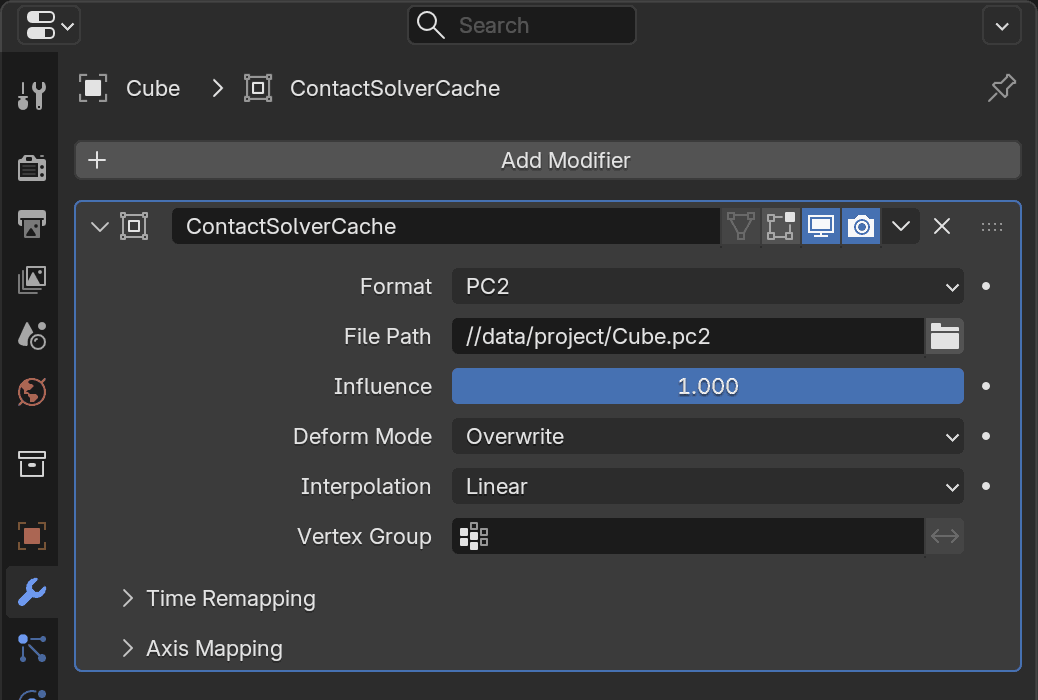
What the fetched result looks like in Properties → Modifier Properties after the first fetch. The File Path points at a
.pc2file under<blend_dir>/data/<blend_basename>/, which Blender reads directly as you scrub the timeline.
Tip
Save the .blend at this point. The add-on migrates PC2 temp files into
data/<basename>/ on save and writes a manifest so the scene reopens with
its PC2 files intact.
Tip
To hand off the scene without the add-on, convert the fetched animation into standard Blender keyframes. See Bake Animation.
Note
Both viewport screenshots on this page were produced end-to-end via MCP, no human clicking. See Scene Setup via MCP.