📦 Object Groups
The solver treats your scene as a collection of up to 32 object groups. Each group carries a type, a material model, a set of material parameters, and a list of assigned Blender mesh objects. Only active groups (ones you’ve created) are sent to the solver.
The Dynamics Groups Panel
Everything you do with groups happens on the Dynamics Groups panel in the 3D viewport’s N-panel. The panel is laid out top-to-bottom:
A Create Group button at the very top.
One group box per active group, stacked below.
Each group box contains, in order:
A header row with the group name, an icon representing the group type, a duplicate-group button, and a delete-group button.
An Assigned Objects list of the Blender objects belonging to this group, each with an Include checkbox.
A Pins section with the pin vertex groups attached to this group (see Pins and Operations).
A Material Params box (see Material Parameters).
A Bake row with per-group Bake Animation / Bake Single Frame controls (see Baking Animation).
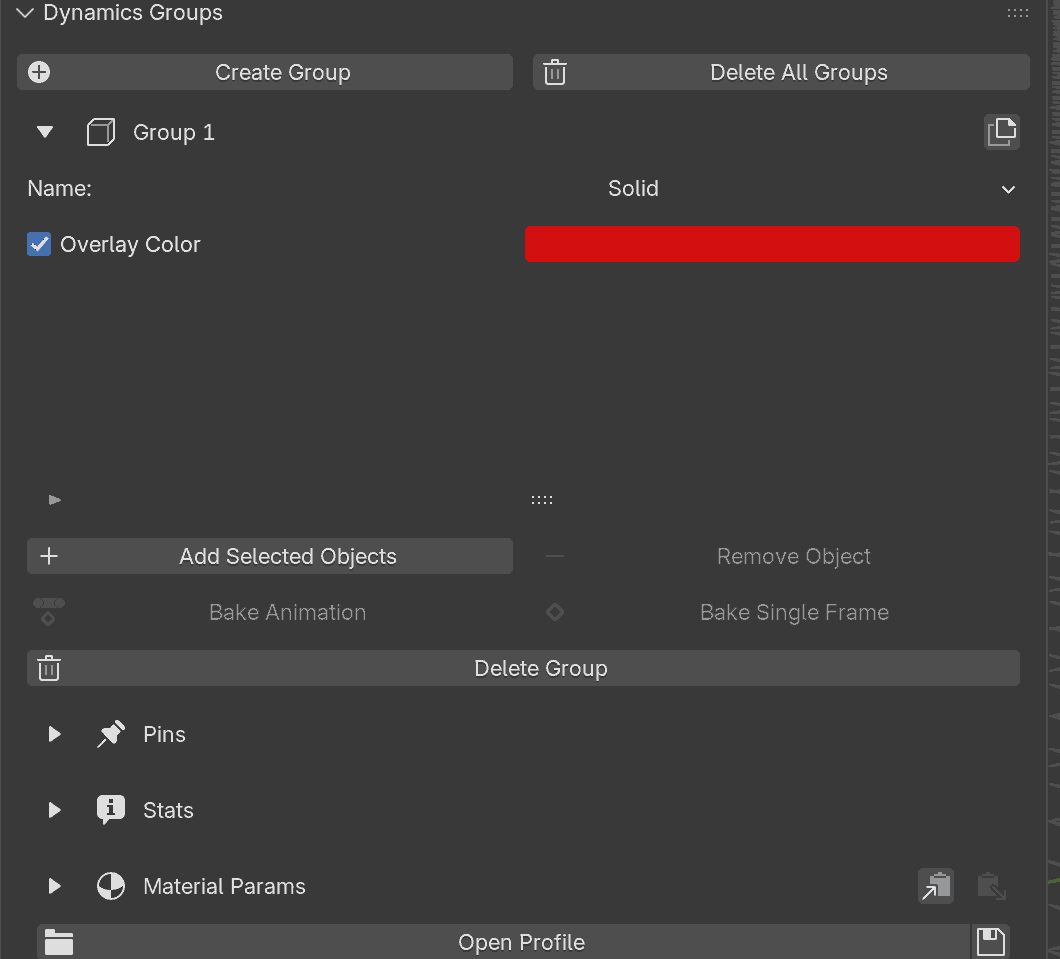
The Dynamics Groups panel with one default group. The Create Group button sits at the top; below it, each group box follows the header, Assigned Objects, Pins, Material Params, and Bake layout.
Creating a Group
Click Create Group at the top of the panel. A new group box is
inserted beneath the button with a default name (Group 1, Group 2,
and so on), the default Solid type, an empty object list, and default material
parameters. The panel auto-scrolls so the new box is visible.
The panel right after a fresh Create Group click: a single
Group 1 box with the default Solid type, an empty object list,
and default material parameters.
Group Types
Type |
Description |
Default model |
Available models |
|---|---|---|---|
Shell |
Thin surfaces (cloth, fabric) |
Baraff-Witkin |
Baraff-Witkin, ARAP |
Solid |
Volumetric bodies |
ARAP |
Stable NeoHookean, ARAP |
Rod |
1D structures (ropes, wires) |
ARAP |
ARAP only |
PDRD |
Rigid bodies (props, rigid shells) |
n/a (rigid) |
n/a |
Sand |
Granular bodies (sand, loose grains) |
n/a (granular) |
n/a |
Static |
Non-deforming collision objects |
N/A |
N/A |
The type controls which material parameters are relevant and which material models are available. Static groups collapse to just Friction and Contact rows and replace the pin region with a Transform sub-box that holds per-object Move By / Spin / Scale ops (an alternative to Blender transform keyframes). See Static Objects for the full surface.
PDRD (Painless Differentiable Rotation Dynamics) groups move a surface mesh as a single exactly-rigid transform: a translation plus a rotation, with no stretch at all. They are cheap and stable for stiff props and rigid panels that should hold their shape (furniture, plates, shells, hard parts of a rig). PDRD bodies still collide, take pins, and stitch to other groups, but they do not bend or stretch like cloth or soft solids. Instead of Young’s Modulus and Poisson’s Ratio, a PDRD group exposes just Density, so the only choice is how heavy the body is; its motion is exactly rigid, so there is no stiffness or rigidity to set.
Rod groups accept both mesh objects and Blender curve objects.
For a mesh, every edge becomes a rod element at transfer time
(faces are ignored by the solver), and the add-on prepends a
Wireframe modifier on assignment so the rod structure shows in the
viewport instead of filled faces. For a Bezier curve, each control
point becomes one rod vertex (1:1 mapping; edge length equals CP
spacing), so simulation resolution is set by the user via CP count.
NURBS curves are sampled per arc at four t values because NURBS
CPs are off-curve.

What each type accepts, models, and exposes. Green check marks mark features available in that column; a gray “n/a” marks features that are not applicable. PDRD is a rigid column: it keeps Density, Friction, and Contact Gap, but drops the deformation parameters (no Young’s Modulus, Poisson’s Ratio, Bend Stiffness, Shrink, Strain Limit, or Inflate) and has no stiffness control because the body is exactly rigid. Static is the thinnest column because the solver only uses it for collision: no material model and no parameters beyond Friction and Contact Gap. The Material Params box in the sidebar reshapes itself automatically to match the column you are in.
Warning
You can have at most 32 active groups in a scene. If you need more, fold objects with similar materials into a shared group; there’s no cost to many objects sharing one group.
Assigning Objects
To put objects into a group:
Select one or more objects in the viewport.
In the target group’s box, click Add Selected Objects.
The button only accepts mesh objects, plus curve objects for Rod groups. Anything else in your current selection is skipped silently.
The add-on also reports user-visible warnings in three situations:
Wrong type. The object type is incompatible with the group’s type. The object is skipped and a warning appears at the bottom of the Blender window.
Already assigned. The object is already in this group (silent skip) or already in another active group (warning; you must remove it from the first group before re-assigning).
Library-linked. The object is a library-linked datablock. These cannot be assigned; an explicit warning is raised. Make the object local first.
When an assignment succeeds, the add-on enables the object’s Wireframe and All Edges viewport overlays and, if the group has overlay color enabled, tints its viewport color to the group’s color.
Important
The solver sees the base mesh, not the modifier-evaluated mesh. The
encoder reads obj.data.vertices directly, so any Subdivision
Surface, Bevel, Remesh, Solidify, or other modifier on
the object’s stack is ignored at transfer time. If the subdivided
or beveled topology is what you actually want to simulate, Apply
those modifiers first (Ctrl-A → Visual Geometry to Mesh, or
modifier header → Apply) and then Transfer.
The one exception is the ContactSolverCache MESH_CACHE modifier the add-on installs after Fetch. It sits in the first modifier slot and deforms the rest mesh before any other deformer runs, so modifiers you add after simulation (a Subdivision Surface for smooth render, for example) stack on top of the simulated result without interfering with it.
Assigned Objects List
Each entry in the Assigned Objects list shows the object name and a small Include checkbox column. Unchecking the checkbox keeps the object in the list for later re-use but excludes it from the next transfer to the solver. This is handy for A/B-testing scenes without dismantling the group.
To remove an object from a group, select it in the Assigned Objects list and click Remove. Removing an object resets its viewport color to white and strips out any pin vertex groups attached to it.
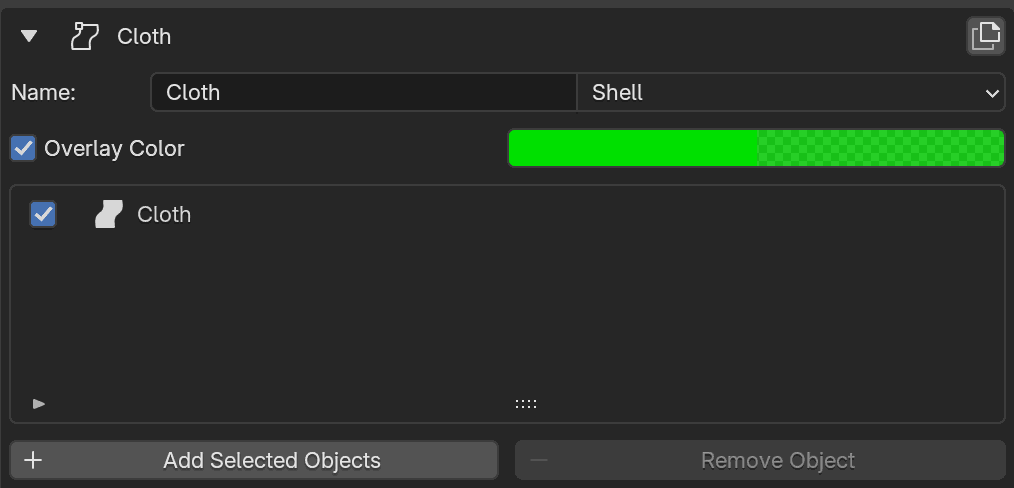
The Assigned Objects list for a Shell group with one Cloth
mesh assigned. The left checkbox is the Include flag; unchecking
excludes the object from the next transfer without removing it from the
group.
Active Collision Windows
For Solid, Shell, and Rod groups, contact detection on each assigned object can be restricted to specific frame ranges. The control lives inside the Material Params box (just below the Contact Gap rows) as the Collision Active Duration Windows toggle.
When the toggle is off (the default), every assigned object collides for the full timeline. Switching it on reveals a per-object editor:
An Object dropdown picks which of the group’s assigned objects to edit.
Below it sits a list of Active Windows for that object: frame ranges during which contact is enabled. Up to 8 windows per object.
The + / − buttons add and remove entries; new windows default to frames 1 to 60.
Selecting a window exposes Start and End spinners that edit its bounds.
Outside every window listed for an object, that object’s contact is muted. A few rules worth knowing:
No windows on an object means contact is always active. Flipping the toggle on by itself does not disable anything; you must add at least one window on a given object for the cutoff to apply to it.
Invisible colliders are not affected. Walls and spheres always collide, even when surrounding deformables have collision windows set. Invisible colliders have their own per-collider Active Duration field; see Invisible Colliders.
Static groups have no collision windows. Static objects collide for the full timeline; if you need them to come and go mid-shot, animate their visibility or use their Transform ops (see Static Objects).
Typical uses are timed catch-and-release setups (a hand grabs a piece of cloth, then lets go without re-engaging) and sequential drops where a stack of objects should only start interacting once each lower piece has settled.
Overlay Colors
In the group header there’s a small color-swatch control. Clicking it opens Blender’s standard color picker; picking a color immediately tints every assigned object’s viewport outline to that color, so you can see at a glance which objects belong to which group in the viewport.
Note
The overlay color is not a material. It is only a viewport preview tint used to distinguish groups at a glance, making it easier to track which objects are assigned and what types they are. It is not sent to the solver and has no effect on the simulation.
A checkbox next to the swatch toggles the overlay on and off. When off, the assigned objects return to their original viewport colors; when on, they re-tint to whatever the swatch currently holds.

Top rows of a Shell group box. The Overlay Color checkbox on the left and the color swatch on the right control the viewport tint; clicking the swatch opens Blender’s color picker. The duplicate icon sits in the top-right of the header row (covered below).
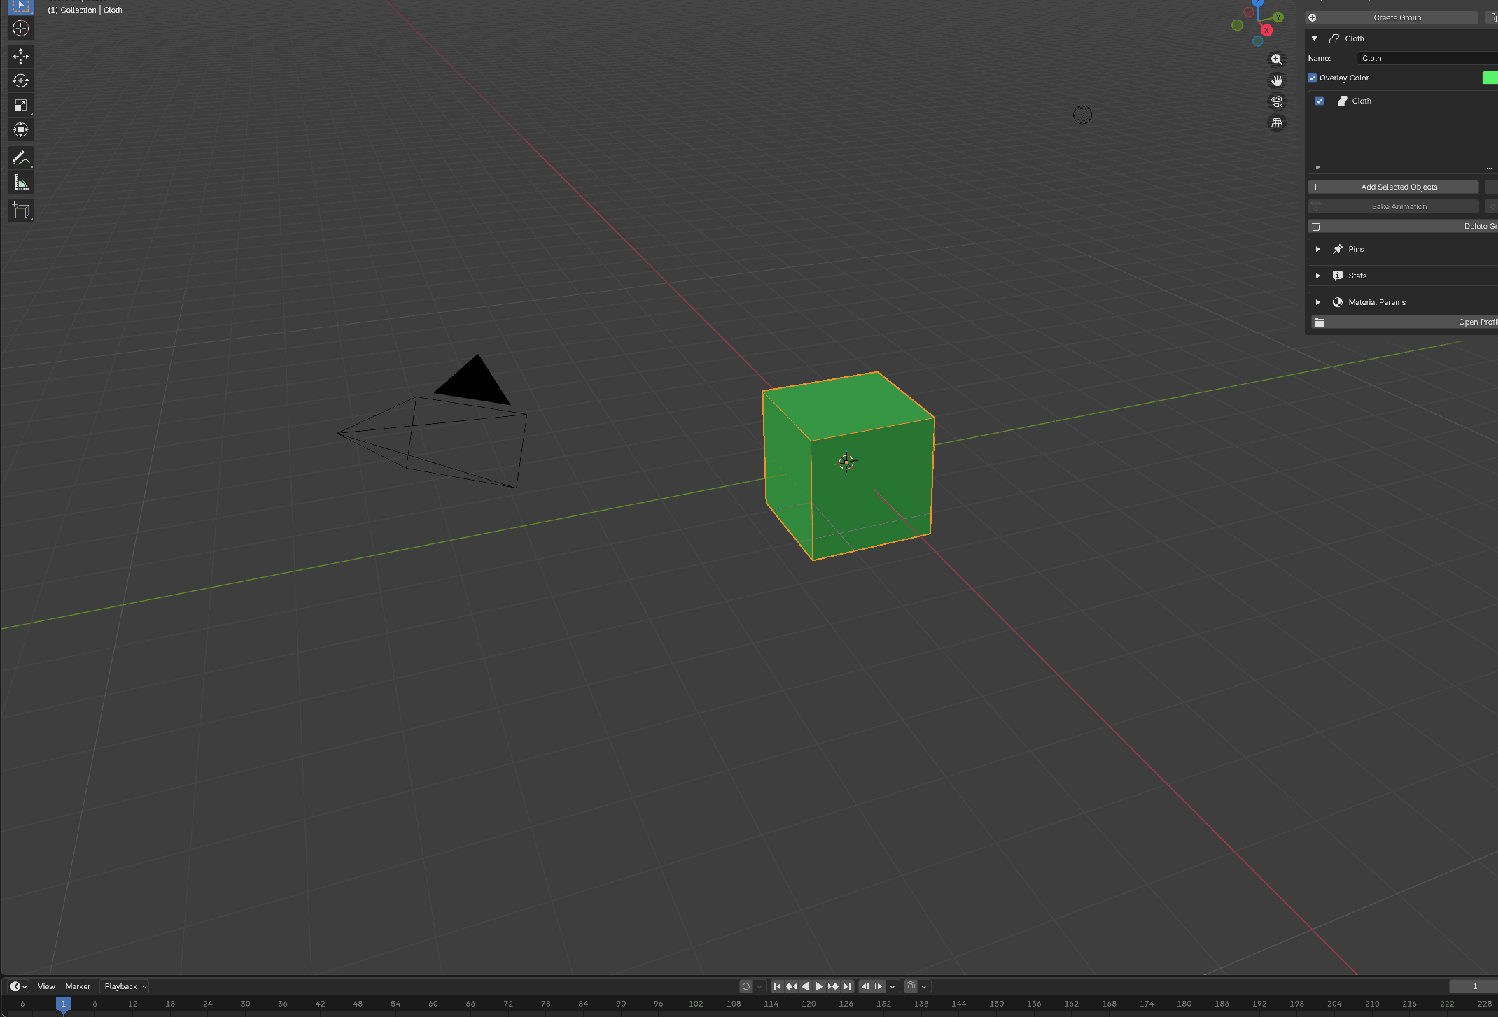
Overlay colors in action. The Cloth object is assigned to a Shell group whose swatch is set to green (visible on the right of the Overlay Color row in the sidebar). With solid shading’s color mode set to Object (which the add-on flips on for you when an assignment succeeds), the cube itself reads green in the viewport. Multiple groups picking distinct swatches lets you spot which object belongs where without clicking each one.
Each group gets a default overlay color based on its type:
Type |
Default RGB |
|---|---|
Solid |
red |
Shell |
green |
Rod |
yellow |
PDRD |
magenta |
Static |
blue |
Duplicating a Group
The duplicate icon in the group header spawns a new group with the
same material parameters as the source. Objects, pins, and pin
operations are not copied; the new group is empty. The name
auto-increments: Silk → Silk-1, Silk-1 → Silk-2.
The Duplicate icon lives in the top-right of each group’s header row (right of the group name). Clicking it clones only the material parameters into a fresh group slot; the new group has no assigned objects, no pins, and no pin operations.
Deleting Groups
Delete Group (the trash icon in the group’s own box, below the Bake row) resets a single group slot. Assigned object colors are restored to white and any pin vertex groups are cleaned up.
Delete All Groups (top row of the panel, next to Create Group) iterates all 32 slots and resets each active one. The UI confirms before proceeding.
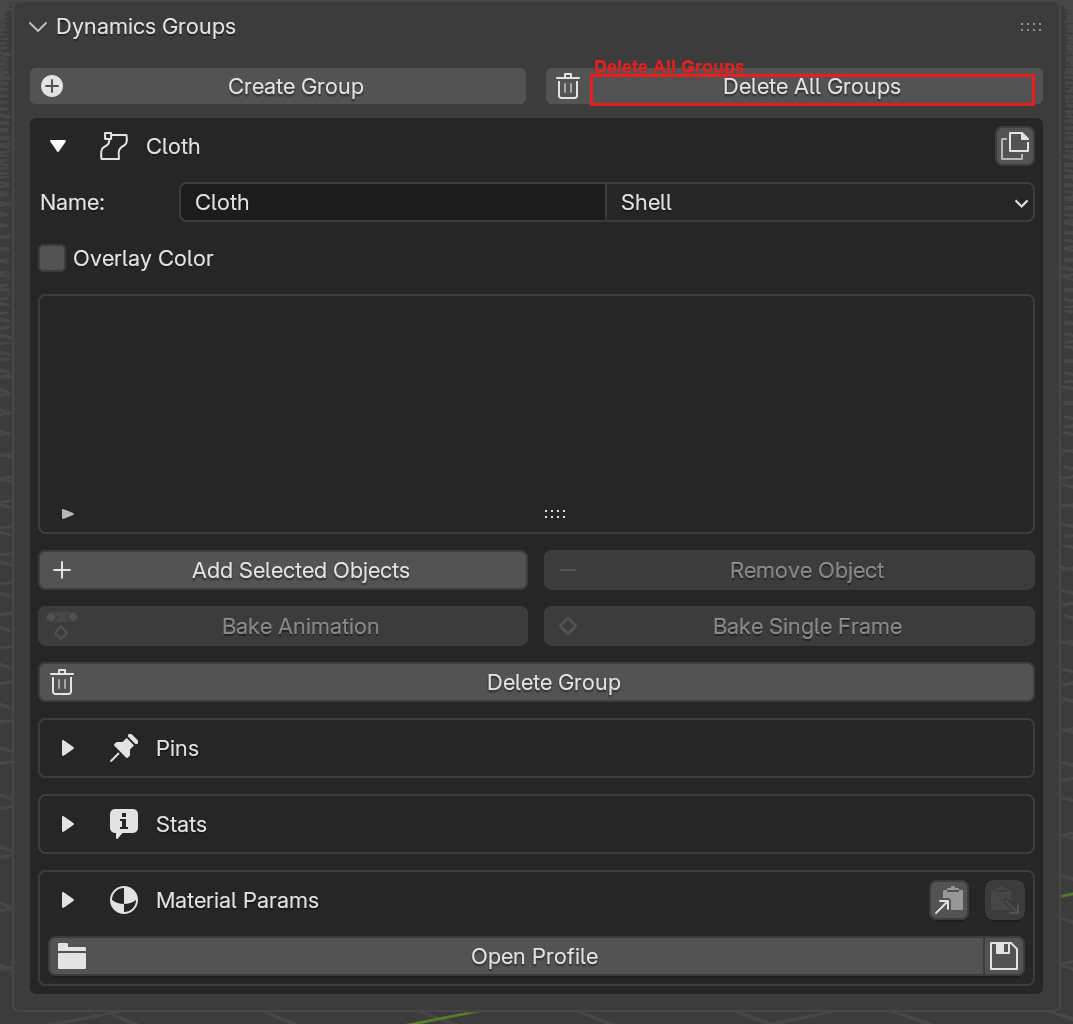
Delete All Groups sits in the panel’s header row, paired with Create Group. The per-group Delete Group button is visible below inside each group box (with the same trash icon, at full width).
Blender Python API
The same workflow is available from Python. The API mirrors the UI
one-for-one: groups are created through solver.create_group, objects
are assigned with group.add, and every operation on a group returns
the group itself for easy chaining.
from bl_ext.user_default.ppf_contact_solver.ops.api import solver

# Create groups of each type.
cloth = solver.create_group("Cloth", "SHELL")
body  = solver.create_group("Body",  "STATIC")

# Assign Blender objects by name.
cloth.add("Shirt")
cloth.add("Skirt")
body.add("Character")

# Override the overlay color (RGBA, 0 to 1).
cloth.set_overlay_color(0.2, 0.8, 1.0, 0.75)

# Delete one group, or wipe them all.
cloth.delete()
solver.delete_all_groups()
Under the hood
32-slot model
The 32 slots are fixed properties on the scene (object_group_0 through
object_group_31), not a dynamic collection. Creating a group takes the
first inactive slot; deleting one frees the slot. This means:
Groups survive file save / load without reassignment.
The underlying slot index is not the same as the display number: the UI renumbers visible groups sequentially (1, 2, 3, and so on) even if the underlying slots are 0, 3, 7.
Library-linked rejection
Library-linked objects are rejected because the add-on stamps a persistent UUID on each assigned object, and library overrides are not writable at the level the UUID lives on.